
Range slider - Overview
Range sliders provide a visual indication of a selected interval within a defined range by moving two handles along a horizontal track to set both a minimum and maximum value.
AndroidreleasedElementsreleasediOSreleasedReact 19released
Example
html
<w-slider label="Range" min="0" max="100">
  <w-slider-thumb
    slot="from"
    aria-label="From value"
    name="from"
  ></w-slider-thumb>
  <w-slider-thumb slot="to" aria-label="To value" name="to"></w-slider-thumb>
</w-slider>
Overview
Range sliders are best suited for quickly selecting an interval within a designated range. They offer an intuitive way to adjust settings like volume, price filters, or relative distances.
Sliders are available in two variants:
- Single slider
- Range slider
Anatomy
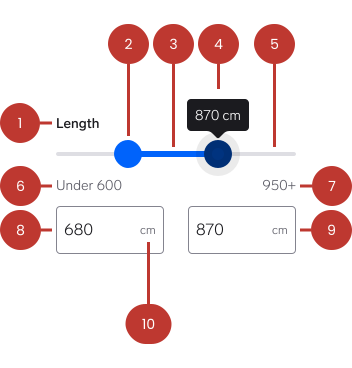
- Label (optional): Describes what type of data the slider controls or adjusts.
- Handles: Two movable elements used to select a minimum and maximum value within the range.
- Filled/active track: Visualises the selected portion between the two handles.
- Tooltip: Displays the current value while dragging a handle, providing immediate feedback.
- Track: Represents the full possible range of selectable values.
- Minimum range label (optional): Indicates the lowest selectable value and defines the start of the range.
- Maximum range label (optional): Indicates the highest selectable value and defines the end of the range.
- Minimum value input/text field (optional): Displays the current minimum value selected by the left handle and allows manual entry.
- Maximum value input/text field (optional): Displays the current maximum value selected by the right handle and allows manual entry.
- Text field suffix (optional): Provides contextual clarification for values when their meaning is ambiguous, such as currency or measurement units.
Questions?
Feel free to ask any questions on usage in the Warp DS Slack channel: #warp-design-system